How it started
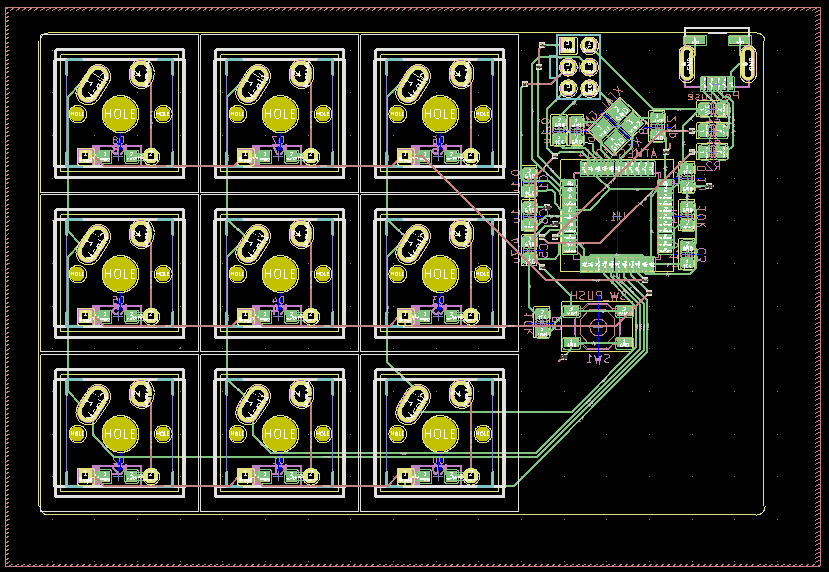
PCB layout — 3x3 key matrix on the left, AVR and supporting circuitry on the right
My close friend John taught me KiCad back in grad school and I kind of just ran with it. The macro board was my first real PCB project — a 3x3 grid of mechanical switches wired to an AVR microcontroller, with everything I needed to flash firmware over ISP. Once the board was done I designed a case in CAD and 3D printed it, so the whole thing is custom from the circuit up.
I definitely do not use it to gain an unfair advantage in StarCraft 2.
PCB Design
The layout splits cleanly into two halves — the key matrix takes up the left two-thirds of the board, and the AVR with its supporting components sits on the right. It's a standard 3x3 matrix with a protection diode on each switch to prevent ghosting, external pull-ups on the column lines, and a 16MHz crystal for the clock.
Programming is handled through a 6-pin AVR ISP connector (RST, SCK, MOSI, MISO, VCC, GND), and there's a reset switch and some decoupling capacitors scattered around the board to keep the power supply stable. All SMD components, 2-layer board with a ground plane.
Microcontroller: AVR ATmega32U4
Switches:        MX/Alps compatible mechanical
Diodes:          SOD123, 1N4148
Crystal:         16MHz SMD
Capacitors:      0805, 0.1μF and 4.7μF
Resistors:       0805, 10kΩ pull-ups
Programming:     AVR ISP 6-pin
PCB:             2-layer with ground plane
The build
Designing the schematic in KiCad was the easy part — running traces on the actual PCB layout took a lot more trial and error, especially keeping the ground plane clean and getting the crystal load capacitors close to the MCU. A lot of what John taught me was less about the tool mechanics and more about layout discipline: keep your decoupling caps close to the power pins, think about return current paths, don't route high-speed signals near each other.
After getting the boards back I soldered everything up, flashed the firmware, and then printed a case to finish it off. Having a physical enclosure made it feel like an actual product rather than a bare PCB sitting on a desk. The switches are MX-compatible so I could swap in whatever feels right for the use case — heavier linears for keys you want to hit deliberately, lighter ones for rapid inputs.
Rapid inputs that I am using for entirely legitimate productivity purposes.